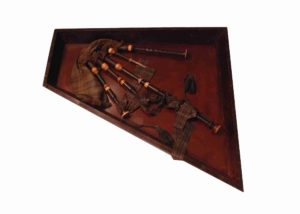
Mounted piece of shrapnel from the siege of Kimberley, 1899-1900
The object I have chosen is a lump of rusty metal, mounted on a pale wood board, sitting on a shelf at the back of the store, rarely looked at, and even more rarely appreciated. Museums tend to acquire various rocks, rubble and other bits and pieces. Very nice if you are a museum of geology, but for a Regimental museum slightly more awkward. Often these objects are stored in a box and never seen again, but in this case not only do we know what the object is, we also, more importantly, know why it is in the collection.
The Second Anglo-Boer War, 1899 to 1902, saw a confident, even arrogant, British force, dealt with severely by Dutch farmers using tactics and weapons that the our Khaki clad warriors simply weren’t trained for. The result of this was several defeats before a change of command and strategy gradually allowed the British to gain the upper hand.
At the beginning of the conflict the Boer forces moved quickly to besiege the British in the towns of Kimberley, Mafeking and Ladysmith. The British Army strategy for the conflict was a series of thrusts designed to capture the Boer capitals, but it was forced to change this in light of public opinion which demanded the army first relieve the besieged garrisons.
Kimberley, which at the time was the second biggest town in the Cape Colony, was the source of 90% of the world’s diamonds. The British garrison initially comprised of four companies of the Loyal North Lancashire Regiment, some Royal Engineers and a few obsolete pieces of artillery. As the potential Boer threat became clear the town was reinforced by 2,000 irregular soldiers, the Kimberley Light Horse, 120 horsemen from the Cape Police, and eight Maxim guns. All of these men were under the command of Colonel Robert Kekewich of the Royal North Lancashire Regiment. Unfortunately he soon found his authority undermined when the millionaire, and pro Empire figure of Cecil Rhodes decided that his time would be better served as part of the garrison, as opposed to tucked away safely behind the lines.
With pressure from Rhodes, who insisted on reading every command sent by Colonel Kekewich, and countermanded quite a few of them, as well as trying to keep his ad hoc force together, and fight the Boers, it is a wonder that Kekewich managed to hold the town as successfully as he did.
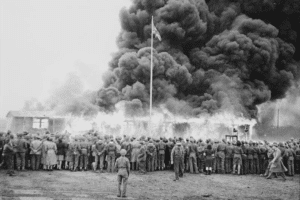
For 124 days the forces in the town beat off repeated assaults and showed great ingenuity in using their inadequate resources. Here The Rhodes Mining Company under their Chief Engineer George Labram proved invaluable, constructing as they did, fortifications, an armoured train, a watchtower, and a 3.9” artillery piece, fondly called Long Cecil. Unfortunately this last piece of engineering prompted the Boers to bring in their own heavy artillery piece, called Long Tom, to bombard the town, though being good Christians the Boers refused to fire it on a Sunday. Regrettably George Labram was killed by a shell from Long Tom a week before the town was relieved.
The British response to the siege was to organise a column under the command of Lord Methuen. However this relief force was stopped by the forces of General Cronje at the battle of Magersfontein, and the two defeats that followed, called Black Week in the British press. With Methuen’s column unable to reach the town a cavalry force under Major General John French was assembled with the task of getting their as quickly as possible. The Boer forces defending the approaches were forced to divide their troops when Sir Hector MacDonald led his Highland Brigade to Koedoesberg.
With the Boers now unseated from their defences French’s forces were able to reach the town on the 15th February 1900 having covered 120 miles in four days in the heat of an African summer. Having entered in triumph General French promptly snubbed Colonel kekewich by presenting himself to Rhodes directly, but did not have long to rest as he was sent out to try and trap General Cronje’s forces, which were eventually defeated at the battle of Paadeberg.
By now the reader may be wondering why the Black Watch Castle and Museum has a piece of shrapnel from the defence of Kimberley when the Black Watch were not involved in the relief, and this is a more than reasonable question to ask. The reason, I believe, is that the Highland Brigade were part of the first relief column and expended so much blood at the Battle of Magersfontein it is important to remember that theirs was not a sacrifice in vain. The men that fought that day on 11th December 1899 did so knowing that British soldiers with their wives and families were enduring constant attacks and bombardment on an almost daily basis. This goes someway to explain how the Black Watch could endure the rifle fire of the Boers at Magersfontein for a whole day, whilst still attempting to attack the enemy lines. For me this small lump of rusty shrapnel holds the essence of what courage is, fighting in a foreign land, not for yourself, but for others, and in that sense will now be more treasured as an object by this writer.
Share this post
1 thought on “Favourite Artefacts | Richard McKenzie”
Excellent article. I look forward one day to standing in front of the artifact and recalling your account.
Roger Kirwin.
Pennsylvania, USA
As the Collections Assistant at The Black Watch Museum, I spend my days surrounded by conflict-related artefacts such as medals, uniforms, letters, and photographs that


1 thought on “Favourite Artefacts | Richard McKenzie”
Excellent article. I look forward one day to standing in front of the artifact and recalling your account.
Roger Kirwin.
Pennsylvania, USA